

Chalkboard signs have a way of making any space feel warmer and more personal. They work just as well in kitchens and entryways as they do at parties, classrooms, or small shops. Best of all, they’re easy to make at home with simple supplies and a little creativity.
Whether you want to label shelves, add seasonal quotes, or create custom décor for events, this guide will walk you through the process step by step.
Why Chalkboard Signs Are a Decor Favorite
Chalkboard signs are popular for a reason. They’re flexible, affordable, and endlessly reusable.
Some of their biggest perks include:
- You can change the message anytime
- They fit rustic, modern, and farmhouse styles
- They work indoors and outdoors (with sealing)
- They add a handmade, thoughtful touch
Once you learn the basics, you can create a whole set of signs for different rooms or occasions.
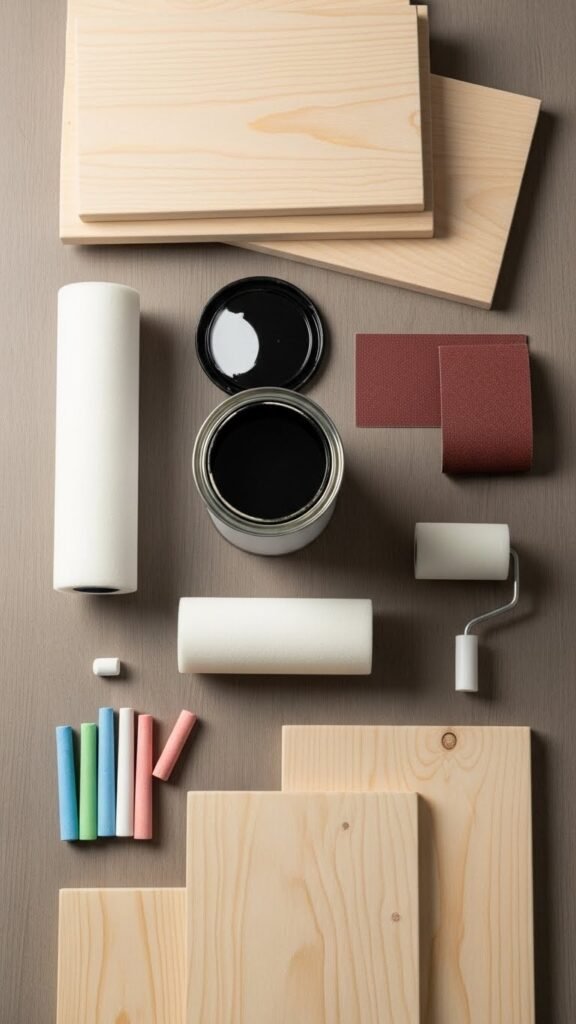
Gather Your Chalkboard Sign Supplies
Before you start, gather everything you’ll need. Most items are easy to find at craft stores or online.
Basic supplies:
- Wooden boards, picture frames, or MDF panels
- Chalkboard paint (brush-on or spray)
- Foam roller or paintbrush
- Sandpaper (medium and fine grit)
- Chalk or chalk markers
- Drop cloth or old newspaper
Optional extras:
- Decorative frames or trim
- Stencils
- Sealer for durability
Prep Your Surface the Right Way
Good prep makes a big difference in how your chalkboard sign turns out. Don’t skip this step.
Start with sanding
- Lightly sand the surface to remove rough spots
- If you’re repainting an old item, sand off glossy finishes
Clean thoroughly
- Wipe away dust with a dry cloth
- Make sure the surface is completely dry
If you’re using a frame, remove the glass and backing before painting.
Apply Chalkboard Paint Smoothly
Now comes the fun part. Take your time for a smooth, professional finish.
Painting tips:
- Stir the paint well before using
- Apply thin, even coats
- Let each coat dry fully before adding the next
Most projects need 2–3 coats for deep color coverage.
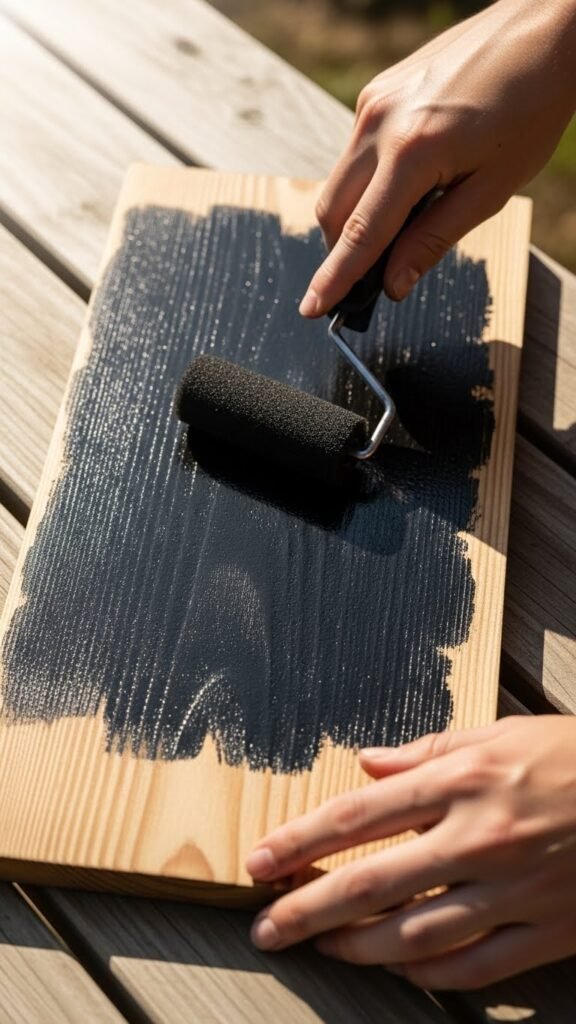
Once painted, let the sign cure according to the paint instructions. This usually takes at least 24 hours.
Season the Chalkboard Surface
Seasoning helps prevent chalk from sticking permanently and makes erasing easier.
How to season:
- Rub the side of a piece of chalk over the entire surface
- Wipe off with a dry cloth or felt eraser
This step creates a smooth writing surface and keeps your board looking fresh.
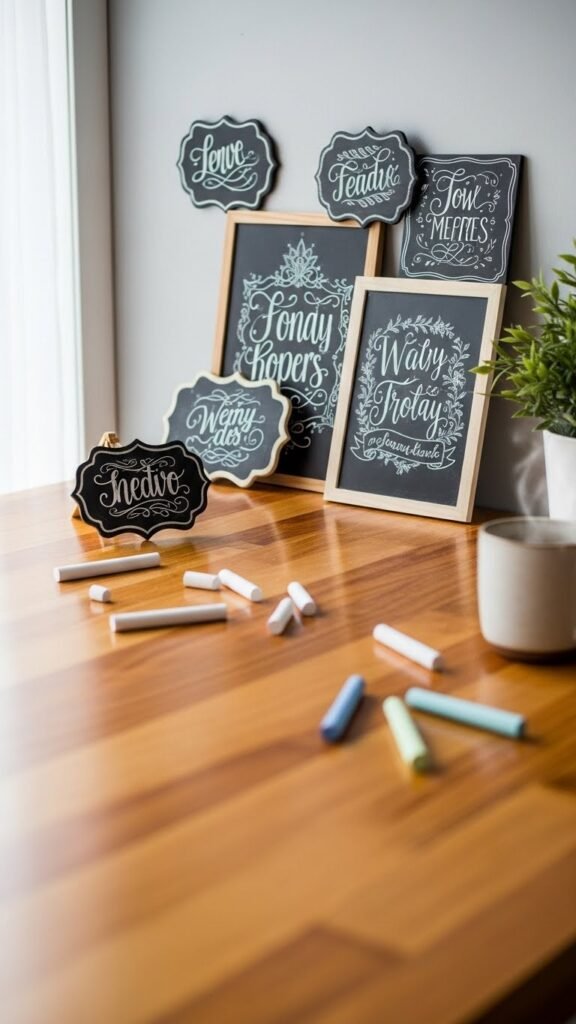
Design Your Chalkboard Message
This is where your sign becomes truly personal. You can keep it simple or add decorative touches.
Popular design ideas:
- Welcome messages
- Daily reminders
- Menu boards
- Seasonal quotes
- Labels for shelves or bins
Helpful design tips:
- Sketch lightly with chalk first
- Use stencils for clean lettering
- Mix thick and thin lines for interest

Add Style with Frames and Details
A simple frame can elevate your chalkboard sign instantly.
Consider:
- Natural wood frames for rustic spaces
- Painted frames to match room colors
- Distressed finishes for vintage charm
You can also:
- Add small hooks underneath
- Use twine or ribbon to hang signs
- Layer chalkboards in a gallery wall
Protect and Maintain Your Chalkboard Signs
If your sign will be handled often or placed outdoors, protection helps it last longer.
Maintenance tips:
- Use chalk markers only if the paint allows it
- Clean gently with a damp cloth, then dry
- Re-season occasionally
For outdoor use, apply a light clear sealer around the frame edges, not the writing surface.
Creative Ways to Use Chalkboard Signs
Once you’ve made one, you’ll probably want more. They’re incredibly versatile.
Try them for:
- Entryway greetings
- Pantry organization
- Craft room labels
- Event décor
- Kids’ creative boards
Each sign can be customized to fit your space and style.
Final Thoughts
Making chalkboard signs is a simple DIY project with a big decorative payoff. With a few basic supplies and a little patience, you can create reusable pieces that feel thoughtful and unique.
Save this idea for later, grab some chalkboard paint, and start creating signs that truly feel like you.

Leave a Reply