

If you want a Christmas decoration that looks festive, colorful, and surprisingly easy to create, a DIY Christmas gift-bow wreath is the perfect holiday project. It’s beginner-friendly, budget-friendly, and absolutely stunning on any door or wall. And the best part? You can customize it with any color palette—classic red and green, metallic gold, frosty pastels, or a bold modern mix.

Let’s walk through the simple steps to create this cheerful Christmas wreath from scratch.
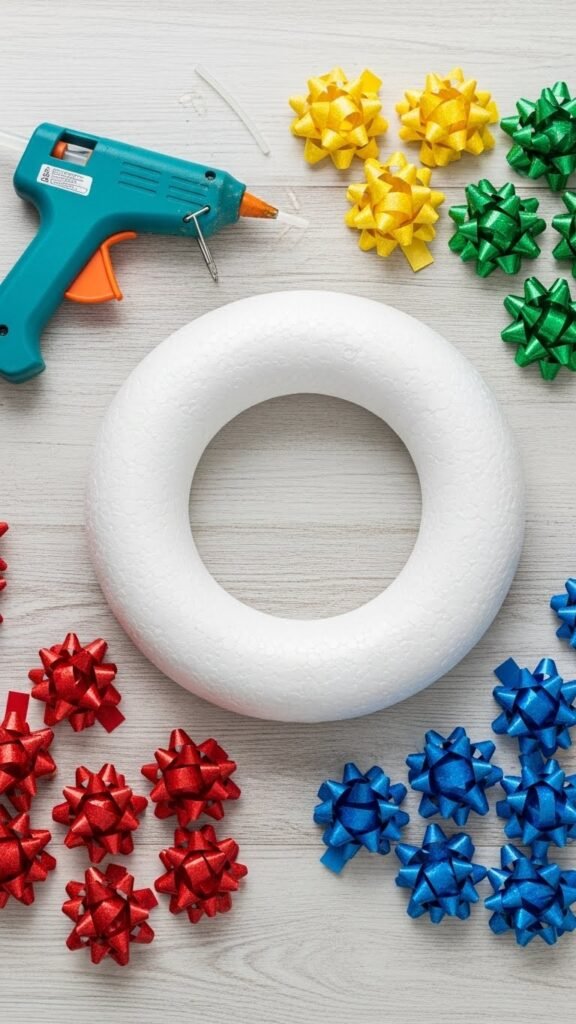
Gather Your Supplies
Before you start crafting, you’ll want everything within reach. This project doesn’t require special tools, making it perfect for quick holiday decorating.
What You Need:
- A foam wreath form (any size, but 12–14 inches works best)
- Assorted Christmas gift bows in various sizes
- Hot glue gun + glue sticks
- Optional: ribbon, mini ornaments, tinsel ties
- Scissors
Tips for Choosing Gift Bows
- Mix sizes: Smaller bows fill gaps beautifully.
- Use a color scheme: Pick 2–4 colors so your wreath looks polished, not random.
- Add a texture variety: Metallic, matte, glitter, holographic—layering textures makes the wreath look high-end.
Prepare Your Wreath Base
Your foam base will determine the wreath’s final shape and fullness. Preparing it properly helps the bows stick better and last longer.
Wrap the Base (Optional)
If your foam base is bright white or green, you can leave it uncovered. But many crafters prefer wrapping it with:
- Ribbon
- Garland
- Fabric strips
This helps add grip to the bows and ensures the form doesn’t peek through any gaps.
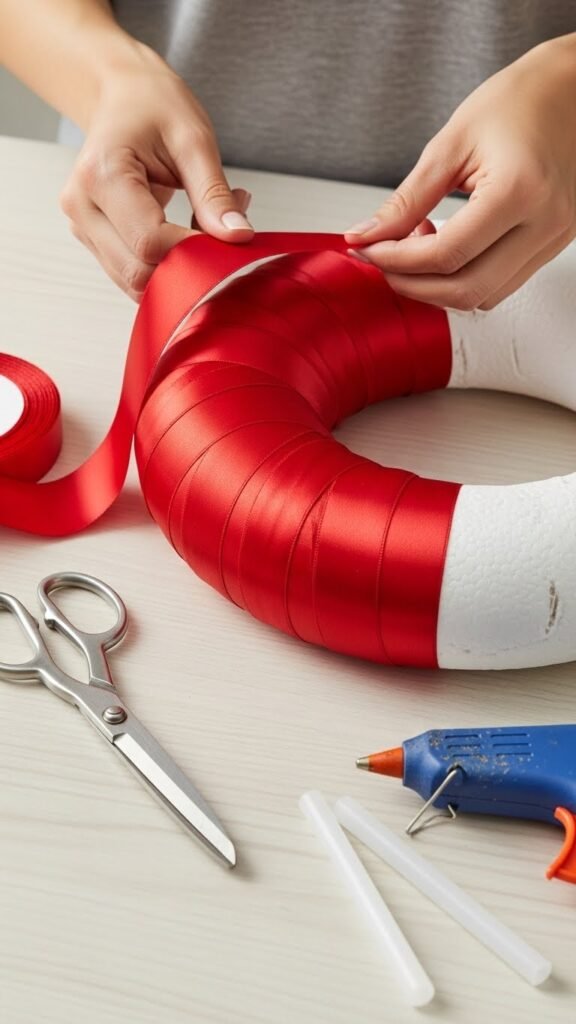
Why Wrapping Helps
- Prevents exposed foam
- Makes the wreath look more finished
- Helps the hot glue adhere for a longer-lasting decoration
Attach the Larger Bows First
Now for the fun part—building your wreath!
Start with your largest bows. These will create the foundation and shape.
Placement Tips
- Space them evenly around the form.
- Angle some slightly outward and inward for dimension.
- Push gently but firmly when gluing to ensure they stick.
You don’t need perfection here—embrace a little asymmetry for a natural, full look.

Avoid Common Mistakes
- Don’t glue bows too close together at first; you’ll need space for smaller bows later.
- Don’t use low-temp glue—it won’t hold well.
- Don’t worry if the base shows through at this stage; it will look full soon.
Fill the Gaps With Medium and Small Bows
Once your larger bows form the wreath’s shape, start working with smaller ones to fill spaces. This step brings the wreath to life with texture and volume.
How to Layer for a Full Look
- Tuck medium bows between larger ones.
- Add small bows around edges and inside corners.
- Adjust colors so no single color dominates one side.
This layering technique gives your wreath a professional-looking finish.
Optional Add-Ins
- Mini ball ornaments
- Glittered sprigs
- Crisscrossing ribbon trails
- Pinecone accents
Just be sure to keep the design balanced and cohesive.
Create a Focal Point (Optional)
If you want your wreath to look even more styled and intentional, add one standout feature.
Some ideas include:
- An oversized bow at the bottom or top
- A cluster of mini ornaments in one corner
- A glittery snowflake
- A holiday character figurine
This adds personality and makes your wreath look truly unique.
Add a Ribbon Loop for Hanging
Your wreath needs a strong, balanced way to hang. A simple ribbon loop is easy and pretty.
How to Secure It
- Cut a piece of ribbon, about 8–12 inches long.
- Form a loop and glue the ends to the back of the wreath.
- Add an extra dot of glue for reinforcement.
If you prefer, you can use a metal wreath hanger instead.
Final Touches and Styling
Before hanging your wreath, give it a final inspection.
Check for:
- Visible gaps
- Loose bows
- Glue strings
- Unbalanced colors
Fluff, adjust, or add a few more small bows until it looks perfect.
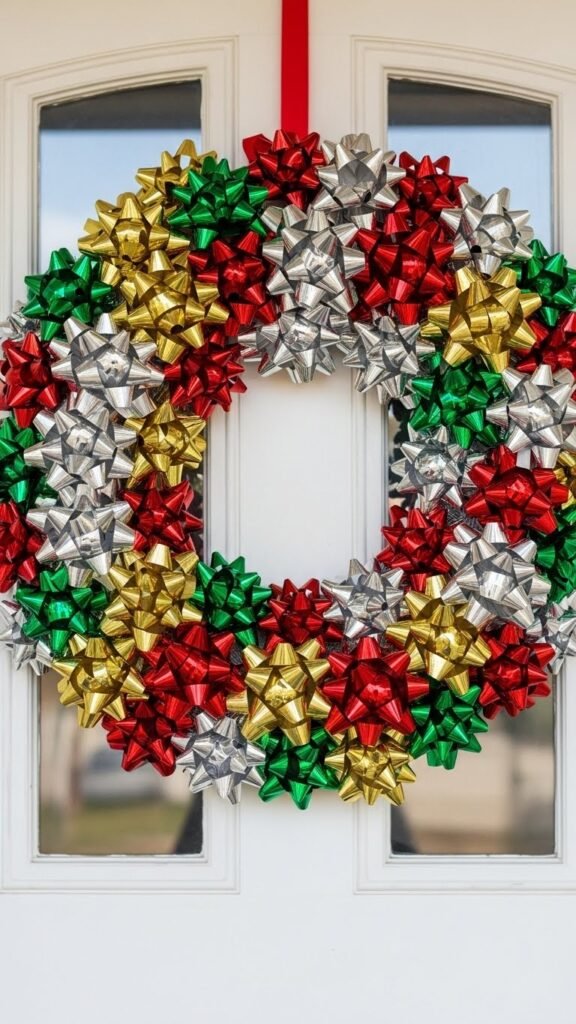
Where to Display Your New Wreath
Gift-bow wreaths are lightweight and versatile, making them great for:
- Front doors
- Bedroom doors
- Office entryways
- Hallway walls
- Above a Christmas centerpiece
- On a gallery wall with other holiday art
Their shiny texture makes them eye-catching from across the room.
Final Thoughts
Making a wreath using DIY Christmas gift bows is one of the easiest and most joyful ways to bring holiday spirit into your home. With just a few supplies and a burst of creativity, you can create a piece that feels festive, modern, and full of color.
Save this idea for later—and enjoy decorating your home with a little handmade holiday magic!

Leave a Reply