

If you love decorating for the holidays but don’t have the floor space for a full-sized Christmas tree, you’re not alone. Wall-mounted Christmas trees have become a trendy, clever solution for small apartments, tight living rooms, and cozy corners that still deserve some festive magic. These space-saving trees are fun to make, easy to customize, and instantly transform any blank wall into a holiday feature.
In this guide, you’ll learn how to create beautiful DIY wall trees using simple materials—whether you want a rustic branch design, a modern geometric look, or a traditional evergreen feel. Let’s jump in!
Plan Your Wall Tree Style and Space
Before you start hanging anything, spend a moment thinking about the look you want and the space you’re working with. A wall tree can be as simple or dramatic as you’d like.
Choose Your Style
Here are a few popular options:
- Rustic branch tree with twigs, wood slices, and natural textures
- Classic evergreen tree made from faux garlands
- Minimalist geometric tree shaped with washi tape or light strings
- Boho-inspired tree with macramé, beads, and natural fibers
Pick the Right Spot
Look for a wall that:
- Is at eye level when standing or sitting
- Gets good natural or ambient light
- Has enough width to build at least a triangle outline
This is also a great time to measure your available space so your décor looks intentional and balanced.
Gather Simple Materials
One of the best things about wall trees is that they don’t require expensive supplies. You can often use what you already have.
Basic Materials You May Need
- Command hooks or removable wall clips
- Twinkle lights
- Faux greenery or garlands
- Ribbons
- Decorative ornaments
- Small branches or twigs
- Craft wire or string

Gather everything ahead of time so you can easily assemble your design without interruptions.
Create the Shape of Your Wall Tree
Once your materials are ready, it’s time to form the iconic triangle shape. This shape can be built using greenery, lights, branches, or even a mix of all three.
Method 1: Evergreen Garland Tree
This is the most traditional approach and looks beautiful in any room.
- Use removable hooks to mark the top point of your tree.
- Add two diagonal lines downward to form the triangle.
- Attach the garland along the hooks.
- Layer a second garland for fullness if needed.
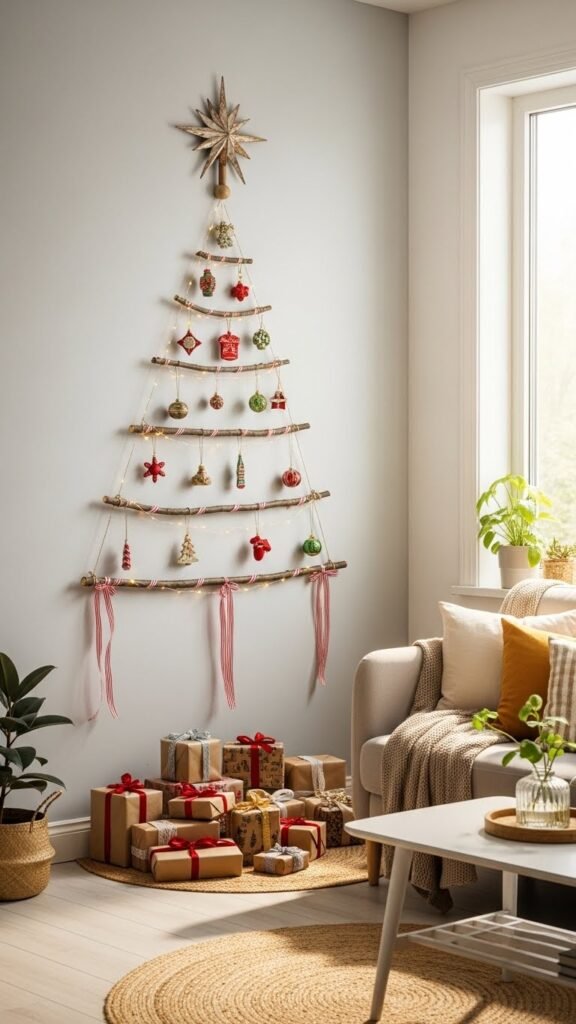
Method 2: Branch or Twig Tree
Perfect for rustic or Scandinavian décor lovers.
- Arrange branches from longest to shortest.
- Place the longest at the bottom and progressively smaller pieces above it.
- Keep spacing even for a clean and elegant look.
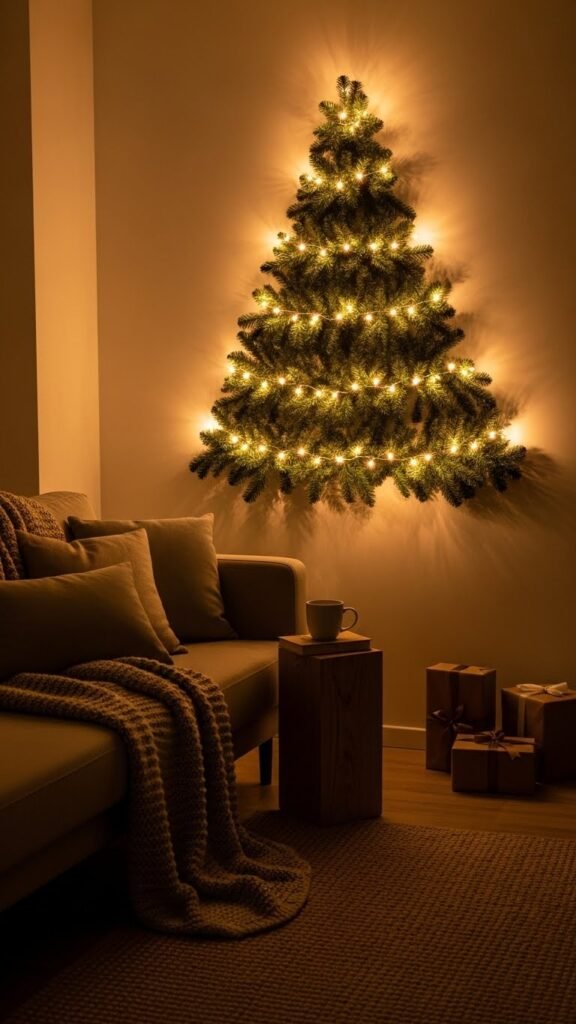
Method 3: Light-Only Tree
A great option if you prefer a softer, glowing effect.
- Create the outline using hooks.
- Attach string lights in the shape of a triangle.
- Add layers of zig-zag lighting for visual texture.

Decorate Your Wall Tree for a Festive Finish
Now comes the fun part—decorating! Wall trees may be flat, but they can be just as charming as a full-size standing tree.
Add Ornaments
Choose lightweight ornaments such as:
- Mini baubles
- Wooden stars
- Felt shapes
- Snowflakes
- Paper ornaments
Use small hooks or craft wire to secure them.
Add Texture
Layer extra items for more depth:
- Ribbon loops
- Greenery sprigs
- Dried orange slices
- Pinecones
Add a Tree Topper
Just like a traditional tree, the topper pulls the entire design together. Try:
- A handmade star
- A ribbon bow
- A wooden cutout
- A felt design
Light Up Your Tree for Extra Warmth
Lights make your wall tree feel magical and complete. Stick to warm white or soft golden hues for a cozy look.
Lighting Tips
- Wrap lights loosely around garlands or branches.
- Avoid pulling too tightly to prevent damage.
- Use battery-operated lights to avoid dangling cords.
- Add a timer so your tree turns on automatically each evening.
If you’re using a minimalist design, lights can serve as the tree’s main feature, giving your wall a soft, glowing holiday charm.
Enhance the Area Around Your Tree
Your wall tree will look even better when the surrounding area feels intentional.
Try Adding:
- Small wrapped faux gifts below
- A cozy bench with holiday pillows
- A little basket filled with greenery
- Framed winter prints
These small touches add depth and make the wall tree feel like part of a complete holiday display.
Final Touches and Personalization
There’s no single “right” way to make a wall tree. That’s what makes this project so fun. Customize your design to fit your personality, your décor style, and your available space.
Here are a few personalization ideas:
- Use family photos as ornaments
- Incorporate meaningful keepsakes
- Add handmade paper crafts
- Try a monochrome theme like gold, forest green, or silver
When you step back and admire your finished tree, you’ll see how small spaces can still hold big holiday magic.
Create a Tree You’ll Love All Season
Wall-mounted Christmas trees are stylish, practical, and full of charm. They’re a perfect solution for anyone who loves decorating but wants to keep the space clear and clutter-free. With just a few materials and a spark of creativity, you can build a holiday focal point that brings joy to every visitor.
Save this idea for later and start crafting your own space-saving wall tree today!

Leave a Reply